Tengu 3220HS / 900kV (6S)

Hand-wound EGODRIFT Tengu 3220HS motor for 380 class rc helicopter models with a kV rating of 900kV - intended for use with 6S LiPo batteries.
$179.00
SKU: 11720
In stock
Details

EGODRIFT Tengu high-performance brushless motors for RC heli are the result of one year of testing and development. The 3220HS comes with a kV rating of 900kV for 6S LiPo batteries and is the perfect choice for your 380 sized SAB Goblin, Oxy4Max or scale helicopter model.

Like all models within the Tengu series, the top of the can features the iconic and heat-resistant EGODRIFT Stickerbomb print, to add the finishing touch to your 380 class heli build.

Each motor comes with mounting screws and 3 pairs of gold bullet connectors.

Specifications
  • Manufacturer: EGODRIFT
  • Stator size: 3220
  • Motor configuration: 12N10P
  • Motor weight: 177g
  • Wire colour: Copper
  • Motor wire type: High temperature copper wire
  • Motor wire: 0.38mm
  • Motor kV: 900 kV
  • Motor shaft: Hardened Steel
  • Shaft diameter: 5.0 mm
  • External shaft length (mm): 22 mm
  • Mounting hole pattern: 4xM3(25)
  • Laser Design: EGODRIFT Stickerbomb
  • LiPo cells: 6S, 7S
  • Stator diameter: 32 mm
  • Stator height: 20 mm
  • Stator lamination: 0.15 mm (+)
  • Body Length: 41.1mm (1.62 inch)
  • Diameter: 40.5mm (1.59 inch)
  • Idle current: 2.8A
  • Maximum Current: 58A (Peak: 60A / 2 seconds)
  • Maximum Power: 1440W (Peak: 1800W / 2 seconds)
  • Internal resistance: 27.5 mOhm
  • Connection: Wire / Gold plated plugs
  • Designer: Yutao Zou

What's in the box

  • 1 x Tengu 3220HS / 900kV Motor
  • 3 x Gold Plated Connector, Male
  • 3 x Gold Plated Connector, Female
  • 4 x Mounting Screws
User Images
See More
 
Reviews
    • Verified Review

    Protos 380 - first impressions

    I tried both kV versions - the 960 and the 900kV version - on the new MSH (XLPower) Protos 380. Even after having dialed down the speed quite a bit, the 960kV was still too much, the 900kV turned out to be the overall better fit for this model out of the box.. Due to the placement of the motor on the Protos 380, the heli could arguably be a little lighter on the nose if a smaller motor was used, but the bigger power of the 3220 well makes up for that in crazy power-loaded fun. I like the combo a lot.

    Review by JD

You're reviewing: Tengu 3220HS / 900kV (6S)

How do you rate this product? *

 
1 1 star
2 2 star
3 3 star
4 4 star
5 5 star
Overall Rating
Product FAQ

Product Questions

What makes HAND-WOUND motors better?

At EGODRIFT we rely on the art of hand-winding motors for every single one of our models (with no exception) for a variety of reasons:

1) Fill grade - packing more copper
While machine winding would certainly be a whole lot faster, cheaper and easier, there are a few technical downsides to using winding machines: The biggest one of them being the achievable fill grade = how much copper (wire) you manage to squeeze into the bell around the stator arms. A winding machine relies on bigger (and static) tolerances to wind the wire lobes around the stator and cannot adjust it's winding routines as good as one of our winding experts can with every lobe. They wrap, pull, push and fit the wires around the stator to manually reduce the empty space between windings to the maximum, thus achieving a higher fill grade in the bell than a machine could. Think of empty space inside a bell and between the stator arms as wasted potential. And for copper on the stators the one thing that holds true is: the more the better.

2) Quality control - Each motor is going through our experts hands
By winding each stator manually, we ensure that all components - the stator itself, as well as the wire, and the finished assembly - is going through the hands of our winding experts for several minutes. Any imperfection in the material or the assembly will immediately be noticed and any products that fail our rigorous standards when it comes to winding our stators can be discarded immediately.

3) True craftsmanship - and not mass production
Our lovely winding ladies have been building motors for us for well over a decade, and we will continue to rely on hand-winding for many years to come. We believe motor winding by hand is an art, and a skill that needs to be preserved. Each one of our motors is a piece of true craftsmanship, not the result of mass production. And we love our staff, and feel it's our responsibility to secure their jobs for the community.

How to change Tengu motor shafts

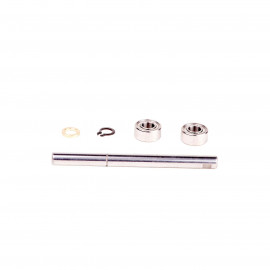
Changing or replacing the shafts on our EGODRIFT Tengu motors for rc helis is a fairly easy and straightforward process. Simply follow the steps outlined below or watch the video on our YouTube channel that will demonstrate the process for you.

1) Remove the retainer ring (c-clip) from the shaft
Using a special pair of pliers made to remove c-clips (or any other appropriate tool) and while applying caution not to damage the clip, remove the retainer ring from the shaft. The clip can be found on the bottom of the motor where the shaft portrudes the can/bell.

2) Locate the shaft screws
Two worm screws are holding the shaft (centered) inside the bell. They can be found when looking through the six round cutouts near the top of the motor (where the stickerbomb printed face is). With a solid 2.0 mm hex driver carefully loosen those screws and remove them from the inside of the motor.

3) Remove the shaft
After the retainer ring (c-clip) and the worm screws have been removed, you should be able to slide out the shaft towards the top of the motor. Be careful not to apply too much pressure or force when trying to remove the shaft, not to damage the bearings.

4) Insert the new / replacement shaft
Take the new shaft you want to place in the motor, and insert it the opposite way you removed the old one. Again, please apply caution when routing the shaft through the bearings (or replace those with new ones from the shaft kit in case you ordered a full kit). Make sure to fully insert the shaft into the motor. If done correctly, the holes for the worm screws and the milled ring for the retainer clip should be in the exact same position as before disassembly.

5) Secure the shaft with screws
Carefully insert the worm screws and tighten them alternating in small steps, to ensure the shaft is centered. You can check the correct position by making sure the shaft spins evenly and freely.

6) Re-attach the retainer clip
To finish the assembly, reattach the retainer clip to the milled ring on the shaft near the bottom of the motor. Check that the shaft is centered and does not oscillate.

Done.

Disclaimer: During assembly in the factory, we check the balance of each motor to ensure the shaft is dead centered and the there is no play to either side. We do not take responsibility for any damages resulting from improper replacement of the shafts on our motors without proper balancing.

What does 12N10P mean? I need this for setting up my YGE 205 telemetry capabilities
This abbreviation refers to the layout / winding scheme of the motor. The first part (N) translates to the number of arms (wire wound poles) on the stator, whereas the second part shows the number of magnets (permanent magnetic poles) on the rotor. So a 12N10P motor features a stator with 12 arms and 10 poles (magnets). Usually the number required for the esc is the second part.
I just recieved a 3220HS/900kV - how many poles do this motor have? What timing do you recommend?
The 3220HS is a 10 pole motor and like with most Tengu HS models, we recommend to set the timing at 9 degrees, test it in flight and adjust in +/-1 steps if necessary.
Can you do a custom wind / motor with special kV for me? What are the costs?

Thank you very much for considering us for your project. As all our motors are hand wound, it is fairly easy for us to fulfill your special kV requirements with a special wind.

Finishing your custom kV motor usually only takes a day, and is offered by us free of charge. Please send us a quick message stating the model (stator size) and kV you are looking for and we'll get back to you in no time.

We're also happy to consult you on your motor choice if you send us a small description of what you're trying to achieve with your setup.